Phone: 1(877) 215.8104
 Login
LoginIn this chapter of the FastWebHost’s GeoIP tutorial we will familiarize you with GeoIP solutions for several of the most popular CMS (Content Management Systems).
GeoIP in Joomla
Joomla is probably the most widely used open-source CMS in the world. Its latest branch is 1.5.x. You can find our detailed Joomla tutorial.
Here at FastWebHost
Install jGeoIPFilter module.
The module can be enabled from the Joomla administrator area -> Extensions -> Module Manager.
You can adjust the module parameters.
we have developed a Joomla 1.5 module based on the GeoIP API. Its name is jGeoIPFilter and it allows you to filter the requests towards your web site based on the GeoIP database.Once the module is published, it will recognize the visitors’ countries based on their IPs. The country code and the flag will be shown in the web site’s front end.
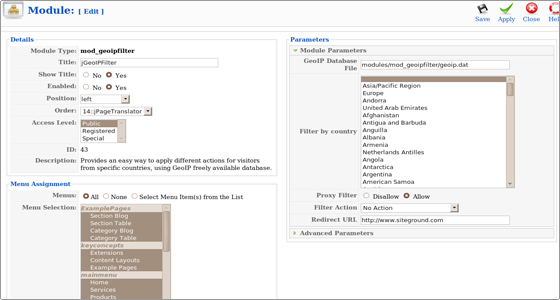
In the Title field you can enter the module title. Below you will find the Show Title radio buttons.
Through them you can define whether the module title will be visible on your web site.
Next, you can enable or disable the module.
You can also pick its position according to the standard positions defined in Joomla.
The Menu Assignment section allows you to pick the menus where the module will be assigned.
You can change the access level. This is a standard Joomla option. The default one is set to Public.
This means that everyone has access to the item. The Registered option gives access only to registered users and the Special option allows only users with author status or higher to access the item.
The parameters of the FastWebHost jGeoIPFilter module are:
- GeoIP Database File – Defines the location of the GeoIP database file. The path is relative to your Joomla installation folder.
- Filter by country – Here you can select the countries with the filtered access to your web site. You can pick multiple countries by holding the Ctrl keyboard key.
- Proxy Filter – You can decide whether requests from proxy servers to be accepted.
- Filter Action – The possible filter actions are to display 403 Forbidden or 404 Not found error messages, to redirect the visitor to a new site or to perform no actions.
- Redirect URL – Here you can enter the URL to which the filtered visitor should be redirected.The advanced parameters are:Module Class Suffix – A suffix to be applied to the CSS class of the module.
- This will allow an individual module styling. Invisible mode – By enabling it any output generated by the module is suppressed.
- Caching – Defines whether the module content will be cached.
- Cache Time – The period in minutes before the module is re-cached.
The access to the administrator area is not filtered. Even if you filter the access from your own country you still will be able to log in your Joomla’s administrator area.
GeoIP in WordPress
WordPress is the most popular blog-oriented php open-source application. Detailed instructions regarding the script installation and maintenance can be found at:
https://www.fastwebhost.com/tutorials/cat/wordpress-tutorial/
The GeoIP plugin for WordPress is called WP GeoLocation. It can be downloaded from the following URL:
http://wordpress.org/extend/plugins/wp-geolocation-js/
The plugin can be installed as a standard WordPress extension:
https://www.fastwebhost.com/tutorials/cat/wordpress-plugins/
Once the WP GeoLocation plugin is installed and activated you can include the following short-code calls in your posts:
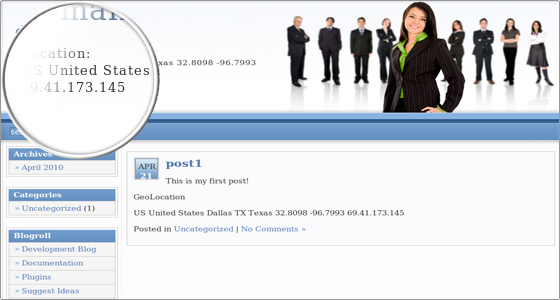
- [mmjs-countrycode] – returns the ISO 3166-2 country code
- [mmjs-countryname] – returns the country name
- [mmjs-city] – returns the city name
- [mmjs-region] – returns the ISO 3166-2 country code (state or province abbreviation)
- [mmjs-regionname] – returns the region name
- [mmjs-lat] – returns latitude
- [mmjs-long] – returns longitude
- [mmjs-postalcode] – returns post/zip code
- [mmjs-ip] – returns ip address
Also, you can include the corresponding Javascript variables directly in your WordPress template code.
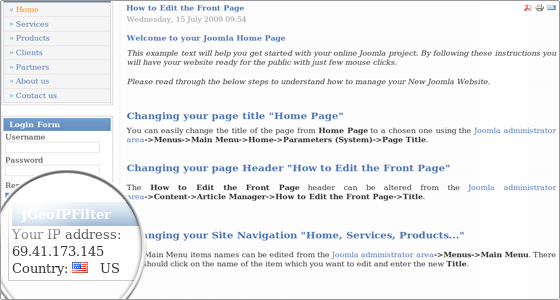
If you want to visualize the geographical information for the visitors in the header of your web site you should edit the wp-content/themes/YOUR_THEME/header.php file. Replace the YOUR_THEME string with your actual WordPress theme.
Find the <div ><?php bloginfo(‘description’); ?></div> line and below enter the following code:
<div>
<br />Location:<br />
<script type="text/javascript">
document.write(mmjsCountryCode + '' + mmjsCountryName + '' + mmjsCity + '' + mmjsRegion
+ '' + mmjsRegionName + '' + mmjsLat + '' + mmjsLong + '' + mmjsIPAddress);
</script></div>
The result will be similar to the following one:
GeoIP in Xoops
Xoops is another popular CMS. Its installation and management instructions are included in the FastWebHost’s comprehensive Xoops tutorial:
https://www.fastwebhost.com/tutorials/cat/xoops-tutorial/
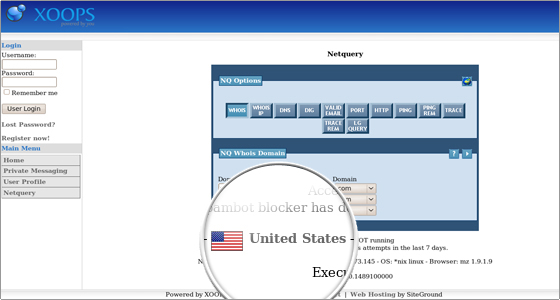
There is a Xoops module, called Netquery. One of its numerous functions is the implementation of the GeoIP functionality:
http://www.xoops.org/modules/news/article.php?storyid=2140
Once you download the module for the Xoops script you should install it as per the modules’ installation instructions published in the Xoops tutorial:
https://www.fastwebhost.com/tutorials/knowledge-base/install-xoops-modules/
Then navigate to the module’s configuration screen in your Xoops Administration Menu -> Modules -> Netquery -> Main Menu and tune it per your needs.
The GeoIP implementation is accomplished through the GeoIP Mapping functionality.
The result can be seen on the Xoops’ front end: