 Phone: 1(877) 215.8104
 Login
LoginCSS (Cascading Style Sheets) is a stylesheet language used to define the text formating and managing the appearance of the web elements on a web page.
Through CSS you can separate the web site design from the actual content. You will set the design of the elements and all the content will be formatted according to the predefined rules. Such implementations ease the work of the web site developers. For example you enter all the content and you decide to make a change in the font of some items. All you have to do is to open the CSS file and set the chosen values in the corresponding elements’ definitions.
In this CSS menu tutorial we will learn how to create vertical and horizontal menus. In the current examples the CSS and the HTML code will be written in a single file (for example index.html). However, you can easy create one .css file and include it in the html files, which will use the defined styles. The line which should be included in the HTML head section is:
<link rel="stylesheet" type="text/css" href="mycss.css"/>
You should replace mycss.css with your actual css file.
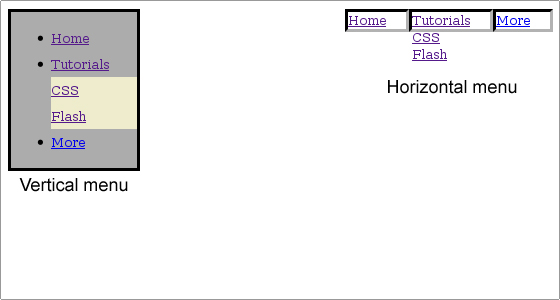
The menus will appear in the following way:
How to Create a Vertical Menu through CSS?
Here we will provide a sample code of a vertical menu, which formating and functionality is defined using CSS:
<html>
<head>
<title>My vertical menu</title>
<!--HTML head including the title tag.-->
</head>
<body>
<!--HTML body including CSS and the HTML code.-->
<!--The beginning of the CSS code section.-->
<style type="text/css" media="screen">
/* Defines the menu attributes: the background color, the menu displayed
as a block, the block black border, the line height and the menu width ->
10% of the whole screen width. */
#verticalmenu{background-color: #acacac; width: 10%; line-height: 2; display: block;
border: 1mm solid #000000;}
/* Hides the list items of the unordered list. */
#verticalmenu li ul { display: none; }
/* When the mouse pointer hovers over the menu elements, the child unordered list items
are shown; they are displayed in a block with a different background color, the list marker
is removed, the space between the element border and the element content is set to 0 using
the padding property and the space around the elements is also 0. */
#verticalmenu li:hover > ul { display: block; background-color: #eeeccc;
list-style: none; padding: 0; margin: 0;}
/* The end of the CSS code section. */
</style>
<!--The HTML part of the body section; Here the menu items are entered;
They are visualized per the above CSS code definitions; in the div container
we specify the unique id, which will be used.-->
<div id="verticalmenu">
<ul>
<li> <a href="http://example.com/">Home</a></li>
<li><a href="http://www.example.com/tutorials/">Tutorials</a>
<ul>
<li><a href="http://www.example.com/tutorials/cssbasics/index.htm">CSS</a></li>
<li><a href="http://www.example.com/tutorials/flash/index.htm">Flash</a></li>
</ul>
</li>
<li><a href="#">More</a>
<ul>
<li><a href="http://www.example.com/about_us.htm">About Us</a></li>
<li><a href="http://www.example.com/contact_us.htm">Contact Us</a></li>
</ul>
</li>
</ul>
</div>
<!--The end of the body section and the html file.--> </body></html>
How to Create a Horizontal Menu through CSS?
In the following part of our CSS menu tutorial we will provide a sample code of a horizontal menu, which formating and functionality is defined using CSS:
<html><head><title>My horizontal menu</title>
<!--HTML head including the title tag-->
</head><body>
<!--HTML body including CSS and the HTML code.-->
<!--The beginning of the CSS code section. -->
<style type="text/css" media="screen">
/* Defines the unordered list attributes: the list marker is removed, the space
between the element border and the element content is set to 0 using the padding property
and the space around the elements is also 0. */
#horizontalmenu ul { padding: 0; margin: 0; list-style: none; }
/* Defines the list items' attributes: the items will float to the left, their position
will be relative to the normal one; the space between the element's right border and the element
content is set to 20 using the padding property; the items are displayed
in a block with a 3D inset border. */
#horizontalmenu li { float: left; position: relative; padding-right: 20; display: block;
border: 3px solid #000000; border-style: inset; }
/* Hides the list items of the unordered list. */
#horizontalmenu li ul { display: none; position: absolute; }
/* When the mouse pointer hovers over the menu elements, the child unordered
list items are shown in blocks; the width is set in em units. */
#horizontalmenu li:hover ul{ display: block; background: none;height: auto;
width: 8em; }
/* No floating elements allowed on either the left or the right side of
the elements. */
#horizontalmenu li ul li{ clear: both; border-style: none; }
/* the end of the CSS code section; */
</style><!--The HTML part of the body section; Here the menu items are entered; They are
visualized per the above CSS code definitions; in the div container we specify the unique id,
which will be used.-->
<div id="horizontalmenu">
<ul>
<li><a href="http://example.com/">Home</a></li>
<li><a href="http://www.example.com/tutorials/">Tutorials</a>
<ul>
<li><a href="http://www.example.com/tutorials/cssbasics/index.htm">CSS</a></li>
<li><a href="http://www.example.com/tutorials/flash/index.htm">Flash</a></li>
</ul>
</li>
<li><a href="#">More</a>
<ul>
<li><a href="http://www.example.com/about_us.htm">About Us</a></li>
<li><a href="http://www.example.com/contact_us.htm">Contact Us</a></li>
</ul>
</li>
</ul>
</div>
<!--The end of the body section and the html file.--></body></html>
Please note that the above code is tested on the latest version of Mozilla Firefox. It should work normally on all new browsers, which support the hover functionality.
Detailed information about the CSS syntax can be found at the following web site.