 Phone: 1(877) 215.8104
 Login
LoginThis tutorial provides detailed information on how to completely transfer a Magento store from one host to another. The same instructions apply if you want to
Follow these steps to transfer Magento from one account to another:
![]()
Step 1: Backup the Magento MySQL Database
Step 2: Transfer all Magento Files
Step 3: Adjust the Magento Configuration
Step 4: Restore the Magento Database
Get a free Magento Transfer by the FastWebHost experts!
 When you sign-up for a FastWebHost hosting account you receive a free transfer for your Magento site as part of your hosting package! Let our experts do the heavy work for you and have your site migrated by us fast and hassle-free!
Step 1 Backup the Magento MySQL Database
On FastWebHost servers you have phpMyAdmin included by default in cPanel for your account. In other cases you will have to use the same tool or a similar one that is capable of exporting your MySQL database. Detailed information on how to perform a MySQL backup can be found in our MySQL Tutorial.
Alternatively, if you don’t have phpMyAdmin installed but you have shell access you can use the mysqldump tool. The syntax is as follows:
mysqldump -h HOST -u USER -p DATABASENAME > FILENAME.sql
where:
- HOST is the database server hostname or it can be omitted if you are running the MySQL server locally
- USER – a user with full privileges to the Magento database
- DATABASENAME – is the full name of the database which Magento is running
- FILENAME – can be anything you find suitable for the backup file
Also, if you have Plesk, DirectAdmin or any other web hosting management tool, you can look at the available options. Many panels allow you to dump the database with just a few clicks. For example cPanel does have an option for this.
Step 2 Transfer all Magento Files
You will need to download all files from your current store and upload them to the new location. This can be a time consuming task considering that a standard Magento installation consists of many files. A good alternative is to archive the files prior to downloading/uploading them if possible.
If you have SSH access you can log on your server -> magento installation directory and archive all the files using the following command:
tar -czif ARCHIVENAME.tar.gz
This will create a tarball archive of all the files in the directory.
You can then download the archive and easily upload it to the new location. To extract it at the new location use the following command in the desired destination folder for the Magento installation:
tar -xzif ARCHIVENAME.tar.gz
Step 3 Adjust the Magento Configuration
After the files are restored you should alter the configuration file in order to match the new settings. All you need to change here is the database details at the new location. Those are stored in the app/etc/local.xml file. The lines you need to alter are:
<host><![CDATA[HOSTNAME]]></host><username><![CDATA[USER]]></username><password><![CDATA[PASSWORD]]></password><dbname><![CDATA[DATABASENAME]]></dbname>
where:
- HOSTNAME should be the database hostname, most commonly – localhost
- USER is a user that has full privileges to the database
- PASSWORD is the password for the database user
- DATABASENAME is the complete database name for the database you are going to use with the transferred Magento
Step 4 Restore the Magento Database
Once you have adjusted the options above you should restore the database at the new location.
A good practice is to add several options in the MySQL backup file prior to uploading it. The following should be added at the beginning of the SQL file:
SET SQL_MODE="NO_AUTO_VALUE_ON_ZERO";SET
@OLD_CHARACTER_SET_CLIENT=@@CHARACTER_SET_CLIENT;SET
@OLD_CHARACTER_SET_RESULTS=@@CHARACTER_SET_RESULTS;SET
@OLD_COLLATION_CONNECTION=@@COLLATION_CONNECTION;SET NAMES utf8;SET
@OLD_UNIQUE_CHECKS=@@UNIQUE_CHECKS, UNIQUE_CHECKS=0;SET
@OLD_FOREIGN_KEY_CHECKS=@@FOREIGN_KEY_CHECKS, FOREIGN_KEY_CHECKS=0;SET
@OLD_SQL_MODE=@@SQL_MODE, SQL_MODE='NO_AUTO_VALUE_ON_ZERO';SET
@OLD_SQL_NOTES=@@SQL_NOTES, SQL_NOTES=0;
The next option should be added at the end of the file after all other queries:
SET
 SQL_MODE=@OLD_SQL_MODE;SET
FOREIGN_KEY_CHECKS=@OLD_FOREIGN_KEY_CHECKS;SET
UNIQUE_CHECKS=@OLD_UNIQUE_CHECKS;SET
CHARACTER_SET_CLIENT=@OLD_CHARACTER_SET_CLIENT;SET
CHARACTER_SET_RESULTS=@OLD_CHARACTER_SET_RESULTS;SET
COLLATION_CONNECTION=@OLD_COLLATION_CONNECTION;SET
SQL_NOTES=@OLD_SQL_NOTES;
You can now import the database using phpMyadmin -> Import or another MySQL tool depending on what kind of access you have to the website.
In case you would like to restore the database via a shell command you can use the following:
mysql -h HOST -u USER -p DATABASENAME < FILENAME.sql
and enter the password for the database user when asked.
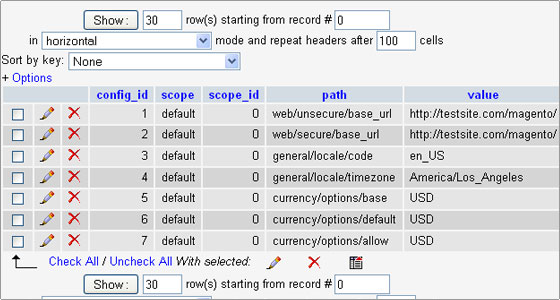
Note that if the Magento online store is supposed to work with a different domain name at the new location you should alter the entries for it in the MySQL database.
The table you should edit is core_config_data and the values you need to change are in the path column. Change the web/unsecure/base_url and web/secure/base_url to match the new domain name by altering the value column for both records.
The last step is to clear the Magento cache. You can do this either via the Magento admin panel > System > Cache management or by deleting the contents of the var/cache and var/session folders inside your Magento installation directory.
That is all. Your Magento should now be properly functioning at the new location.