 Phone: 1(877) 215.8104
 Login
LoginIn order to prevent security issues it is necessary to keep your vBulletin installation and the integrated extensions up-to-date. In this way you will get new features and fix recently discovered bugs or security breaches in PHP, MySQL or vBulletin itself.
The upgrade process differs depending on the version of vBulletin currently installed on your web server. Sites running vBulletin 3 will need to follow slightly different instructions from sites already running vBulletin 4 and upgrading to the latest version.
If upgrading from vBulletin 3.0.x to 3.5.0, or 3.x.x to 4.x.x you will need to recreate yourincludes/config.php file based on the new version of includes/config.php.new. This step would not be necessary for individual upgrades within the 3.0.x or 3.5.x series. If you are upgrading from vBulletin 4.0.x to vBulletin 4.2.x you do not need to edit the config.php file.
Preparing for the Upgrade
Please, make a full backup of your vBulletin system before upgrading its version!
Next, please open your vBulletin Members’ Area and download the latest vBulletin package available. After you have successfully downloaded the vBulletin package on your computer, you will need to prepare the scripts to be uploaded to your web server. Extract the package. When the process is completed, you will find that it has created a new folder called upload and another called do_not_upload.
The upload folder contains the vBulletin files that need to be uploaded to your web server. You should rename the upload folder to match the name you have given to the directory containing your vBulletin files on your web server. In this example, the folder containing the vBulletin files is called forum.
If you have changed the names of the admincp and modcp directories in your config.php file, be sure to make the same change to these subdirectories prior uploading.
Having downloaded the latest vBulletin package and unzipped it to a folder, you must prepare your web server to accept the updated files.
There are two ways achieving this:
- The first method involves overwriting all the files that were previously uploaded to your web server. This is the recommended one.
- The second method involves deleting all the old files and directories, and then uploading the new scripts. In this tutorial we will use the first, overwriting method.
Having renamed the upload folder as specified in the previous step, you should load your FTP client. Connect to your FTP server and start uploading your files. You will most likely be prompted by the FTP client if you want to overwrite the existing files. You should confirm this action. If the prompt gives you the option to overwrite all existing files without prompting again, use this option.
Upgrading Vbulletin
For the sake of this tutorial we’ll assume that you own the domain yourdomainname.com and you are upgrading vBulletin located at http://yourdomainname.com/forum/.
Follow these steps to complete the upgrade:
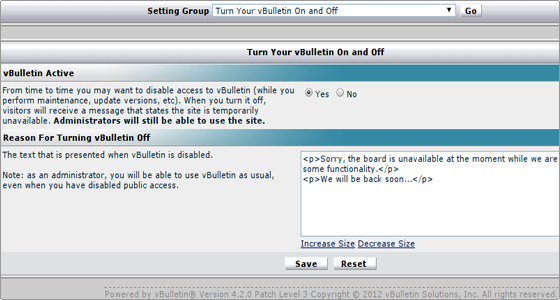
STEP 1 –Log in your current vBulletin and turn the forum off. This can be done through vBulletin admin panel -> Settings -> Options from the left side menu. The first option available to you is to set your board to ‘On’ or ‘Off’. We’re going to press the ‘No’ radio button. Your screen should look like this:
STEP 2 – With the newest vBulletin files uploaded to your web server, you can run the upgrade script. Point your web browser athttp://yourdomainname.com/forum/install/upgrade.php, replacinghttp://yourdomainname.com/forum/ with the correct URL to your own vBulletin installation.
The first thing you will see from the install script is a login prompt, asking you to enter your customer number. Enter the customer code you use to access the vBulletin member’s area and click the Enter Upgrade System button to continue. Then the script will take care of the update process. At the end, after the confirmation message, you need to delete the install.php file from the /install/ directory.
Do not refresh/reload any page during the upgrade process. Doing so may cause database alterations to be applied twice, which can cause errors.
When all the necessary upgrade scripts have been run, you will have the option to load the Admin CP login page.
Do not forget to bring your forum back online!
If you need our assistance with the vBulletin upgrade, you can post a ticket in your FastWebHost Help Desk -> Development Services and our Senior Support Team will upgrade the script for you.
Managing Templates after the vBulletin Upgrade
When a new version of vBulletin is released, usually some of the default templates are updated to accommodate the new features or fix bugs. If you have not customized any of your templates, all is fine for you.
If you have customized some of the default templates there are a few steps you will need to follow after the end of the upgrade script.
When running the vBulletin upgrade script one of the final steps imports the newest version of the default style.
Any templates that you have not customized will be automatically updated to use the newest versions.
However, any templates that you have customized will not be altered or overwritten by importing the latest style. That is why you will need to follow the steps below:
STEP 1 – First, you should visit the Styles & Templates -> Find Updated Templates page to find out which (if any) of your customized templates may have updated default versions.
STEP 2 – If you find that some of your customized templates do not have default versions updates, you have three choices. You can either:
- Do nothing and hope that your customized templates will still work properly with the new vBulletin version. This is often not a problem, but sometimes a variable may have been renamed or some other changes may have been made that will corrupt your customized template.
- Click on the “Revert” link for each template, removing your customizations to ensure that your templates are fully compatible with the new vBulletin version.
- Click on the “Edit Template” link for each template, and compare the contents of your customized template with the version available. Follow the “View Original” link in order to manually update your customized templates to reflect the changes made in the default templates.
Well done! You have now successfully upgraded your vBulletin system!