 Phone: 1(877) 215.8104
 Login
LoginChanging a theme/template with Coppermine is quite an easy task. Generally, you just have to download the theme archive, extract it to your local computer and upload it to your Coppermine themes directory. A good source of free Coppermine themes is the Coppermine themes gallery at FastWebHost.com. Now let us upload a new theme.
First, we will need to find a theme archive to use. For the purpose of this tutorial choose any of the themes available at Coppermine themes gallery. Download the .zip file of any theme on your local computer and extract it. This will create a new directory named after the theme’s name.
However, to make the new theme available for your Coppermine application you will have to upload it on the server. Open an FTP connection using your favorite FTP client and navigate to the directory, where your Coppermine gallery is located (if you access your gallery from your domain name, e.g. http://yourdomainname.com, the Coppermine directory is the public_html folder). Enter the themes directory and upload the whole extracted new theme folder there. This will create a new directory with the theme’s name, which will have the following full path: public_html/themes/theme_name
Changing the Theme of your Coppermine Gallery
![]()
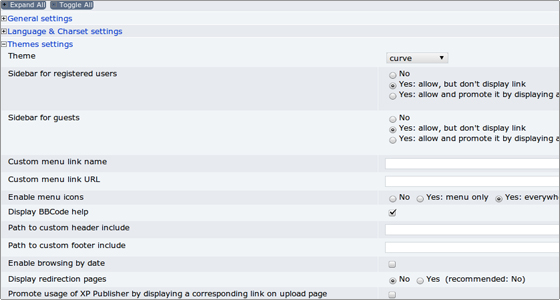
This can be done through the Theme Settings tab. Expand it to see all the features:
Select the new theme from the Theme drop-down menu and save the new configuration.
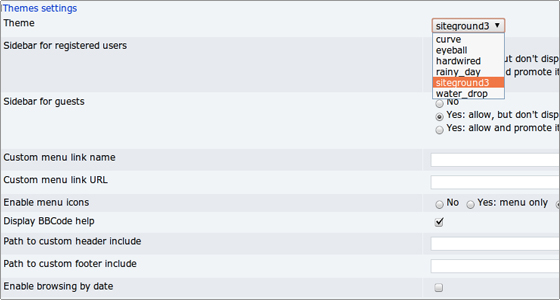
Theme configuration options
![]()
Here we will give a brief explanation of the themes settings.
- Sitebar for registered users – The provided sidebar is compatible with the most popular browsers. After its installation the registered users will have a panel with shortcuts to the most useful gallery functions.
- Sitebar for guests – The same sitebar as the one described above. The access to it is allowed for the guest users who have not registered in the web site.
- Custom menu link name – If you want to create a custom link in your Gallery menu enter its name here. For example – Forum.
- Custom menu link URL – This is the actual URL for the link defined in the previous option. If we take the forum example again it would be something like http://yourdomainname.com/forum.
- Enable menu icons – Enabling it will ease the navigation allowing the users to see icons besides the menu options.
- Display BBCode help – The BBCode options will be displayed to help the users with the BBCode usage in the images descriptions.
- Path to custom header include – If you have programmed a custom header for your gallery script you can include the relative path to it in this field.
- Path to custom footer include – If you have developed a custom footer for your gallery script you can include the relative path to it in this field.
- Enable browsing by date – This option will allow the users to list the files uploaded based on a certain date.
- Display redirection pages – When enabled the user will be taken to a predefined page after a certain action and he/she will have to click on a link to be redirected to the default page.
- Promote usage of XP Publisher by displaying a corresponding link on upload page – When enabled it will inform the users that they can use the XP publishing wizard to upload files.