 Phone: 1(877) 215.8104
 Login
LoginFileZilla has various options which ease its usage and expand its functionality.
In this tutorial we will describe the main FileZilla functions.
Site Manager
The first one is called Site Manager. It can be found under the File menu. Using it you can store the connection details for a new web site. In this way you will not need to enter them every time when the program is started.
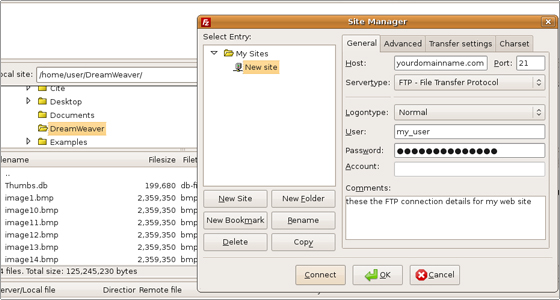
Enter the Host name and the FTP Port (the default one is 21). More details about the FTP connection settings can be found in our FTP tutorial.
You can pick the preferred server type protocol. For a FTP connection it should be set to FTP – File Transfer Protocol. If you want to establish a secure FTP connection over SSH pick SFTP (SSH File Transfer Protocol). More about SSH can be found in our SSH tutorial. The other two options are FTPS (FTP over implicit TLS(Transport Layer Security)/SSL(Security Sockets Layer)) and FTPES (FTP over explicit TLS/SSL). The FTPS option directly establishes the security connection, while the FTPES option allows the client to request the security connection from the FTP server. Detailed explanation can be found in the following article.
Set the Logontype to Normal. In this way you specify the username and the password for the current FTP connection and they are stored in the application data. The alternative options are:
Anonymous – you can log in as an anonymous user without entering the password. More about the Anonymous FTP feature can be found in our FTP tutorial.
Ask for Password – the mechanism is the same as for the Normal option, but the password is not stored in the system. You are prompted for the password when you initiate an FTP session.
Interactive – it works in the same way as the above option, but it asks for the password for every connection. For example if you set several simultaneous connections in order to transfer your files you will be prompted for the password for each one of them.
Account – you can create an FTP account through your cPanel->FTP accounts and enter the corresponding FTP details in your FileZilla Site Manager area. Name the account per your preferences.
The connection will be established by clicking on the Connect button.
You can Rename, Delete and Copy the new site connection. You can set a new folder in the directory tree and add a new bookmark for the web site connection.
The Advanced section of the Site Manager allows you to define the server type (for example Unix). The best solution is to leave the software to detect automatically the server type (the Default option). Additionally, you can select the default local and remote directories for the FTP connection and adjust the server time zone offset.
In the Transfer Settings section you can switch between the active and the passive FTP modes and increase the number of the simultaneous connections. On the FastWebHost servers use the passive FTP mode.
In the Charset section you can set the charset for the file names used by the server. The best solution is to pick the Autodetect option.
Settings
Another important function is called Settings.
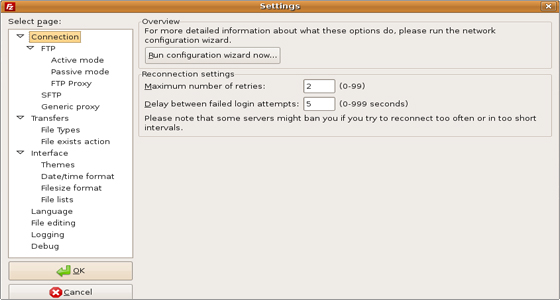
It is divided in different sections.
In the Connection section you can adjust the maximum number of retries if a connection fails and the seconds between them. Also, you can run the firewall and the router Configuration wizard. It will help you to configure the settings of a firewall or a router in order to make sure that the FTP connection will not be interrupted by them.
In the FTP subsection you can adjust the Active and the Passive modes, set the FTP Proxy details, add the SSH private key file in the SFTP area and enter the Generic proxy details.
In the Transfers section you can set the maximum number of simultaneous transfers and limit the number of the concurrent downloads and uploads. Also, you can limit the upload and the download speed. Additionally, you can set the timeout which defines the period that FileZilla will wait in case the data can not be sent or received before it drops the connection.
In the File Types subsection you can define the default files’ transfer type (ASCII or Binary). You can select the extensions of the files which will be treated as ASCII.
The File exists action subsection allows you to define the action which will be performed if the corresponding target file already exists. Among the possible choices are: Ask for action, Overwrite, Resume, Rename, Skip and others.
In the Interface section you can pick the preferred theme and layout, define the visual position of the logs, modify the date/time and the filesize formats. Also, in the File lists subsection you set the sorting order, set the threshold for the timestamp based comparison and define the double-click actions for files and directories.
Through the Language section you can pick the default language for the software.
In the File Editing section you can define the default file editor.
The Logging section allows you to set a log for the software.
In the Debug section you can define the level of debugging. All the corresponding messages will be stored in the log file which will allow you easily to determine and resolve problems which may occur during the FileZilla usage.
Manual Transfer
Under certain circumstances you may need to transfer a single file using the manual transfer functionality.
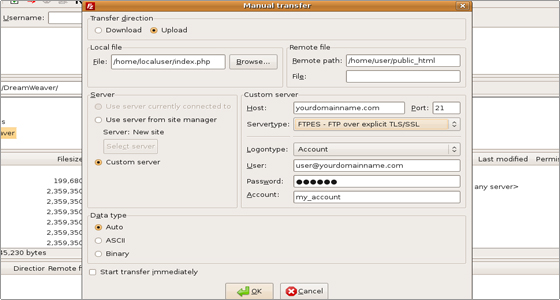
Through this functionality you can define the transfer direction (Upload or Download). You can pick the local file, the remote one and the remote folder. You can use the FTP connection details for a server defined through Site Manager or you can manually enter the corresponding information. Also, you can define the data type of the uploaded/downloaded file (ASCII or Binary) and pick the option to start the transfer immediately. Click on the OK button to confirm the chosen configuration.
Bookmarks
If you need to access the files in different folders under your account the Bookmark functionality will ease your efforts. Click on the Bookmarks menu and pick the Add bookmark option.
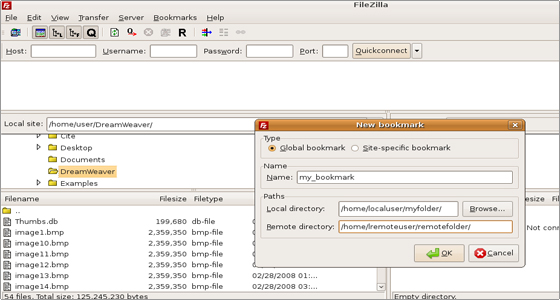
There you can define whether the bookmark will be valid globally or just for a specific web site.
Next, enter the name of the bookmark.
At the end specify the paths for the local and the remote directories. In this way after the FTP connection is established you can use the bookmark to open the folders instead searching for them in the folder tree. It is useful if you need to upload files to many different folders. Just set different bookmarks and switch between them through the Bookmarks menu.