 Phone: 1(877) 215.8104
 Login
LoginHow to upgrade the Gallery 2 application?
Updating Gallery is quick, easy and can be done in a few minutes.
Please follow these steps, in order to complete this process properly:
STEP 1 Make a backup
The upgrade process should be very safe.
But just in case, it’s a very good idea for you to make a backup.
So before you perform this upgrade you should backup the database and the files of your Gallery application.
If something goes wrong, you can always restore the backup and try again.
You can check our detailed backup tutorial for more instructions on how to backup your script installation.
STEP 2 Identify your Gallery 2 version
In order to know which upgrade package to download, you need to know which version of Gallery you currently run.
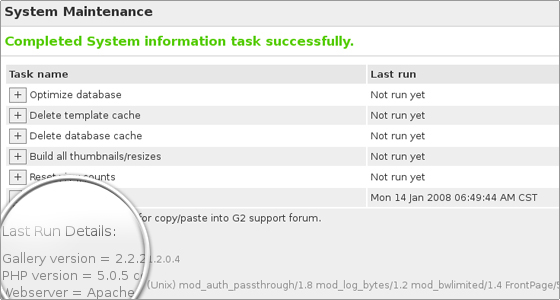
Browse to your Gallery 2 installation in your web browser, log in as an administrator, click the “Site Admin” link then click the “Maintenance” link.
You’ll be presented with a list of maintenance tasks.
Next to the task marked System Information click the run now link and then look for a line labelled Gallery version.
STEP 3 Review the Release Notes and Known Issues
Before starting the upgrade, you should review the release notes of the latest Gallery 2 version and scan through the known issues.(The requirements of Gallery 2 might have changed (e.g. the required PHP version) or there might be a documented upgrade problem for your specific setup.)
STEP 4Upgrade the Application Files
There are three ways to upgrade:
- Replace all files: Download a complete replacement for your Gallery 2. This is slower, but very reliable.
- Use an update file: Replace only what’s changed since the major release. This option is only available for security & patch releases. If you’ve modified your Gallery 2 code, this technique can preserve your changes. It’s faster than a complete replacement, but takes a little more know-how.
- Update from Subversion: This is the best approach if you’ve made changes to your Gallery 2 code. It’s relatively fast and won’t step on any changes you’ve made, but it requires a lot of know-how and is not available to most people.
STEP 5 Replace all files
Please, Download a complete new copy of Gallery 2 and simply unpack it on top of your existing Gallery 2 installation and then run the upgrader.This is a simple but a slow method. Also, any modifications that you’ve made to Gallery 2 will be lost when you replace the files, with the exception of template changes made in local directories.
Notes:
- The Pre-Installer can also be used to quickly upload a new version to your website. See: Upgrading with the Pre-Installer
- Gallery 2 packages come in 4 flavors (typical, minimal, full, and developer). You should try to make sure you download the same package as you did before.
STEP 6 Run the web based upgrader.
Once your files have been updated, please, open up your Gallery 2 in your web browser and it will take you to the upgrader automatically.
Follow the instructions there.

On step 2 of the upgrader, the Gallery file integrity check should show Success.
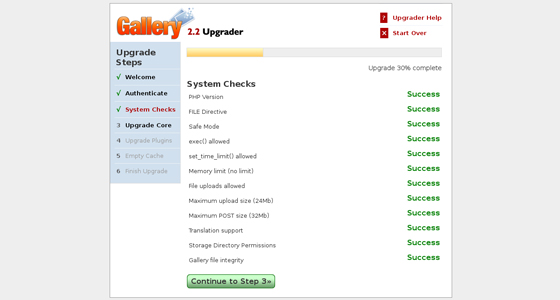
If there are missing/deleted/modified files listed here, you should make sure that these are files that you have modified in your own copy.
If it reports over hundred missing files from the modules/core/test directory then verify that you did not accidentally install the developer zip of changed files over an install that was originally from the minimal, typical or full version.
If you did that’s ok! Just go back and get the right zip file and try again.
Notes:
- If you use a PHP accelerator / cache (e.g. Turk mmCache, Ioncube PHPA, eaccelerator, Zend Studio, etc.), flush (clear) the cache of the accelerator. Omitting this step can sometimes lead to errors during and after the upgrade process.
- If you have not already, backup your Gallery before upgrading the core module!
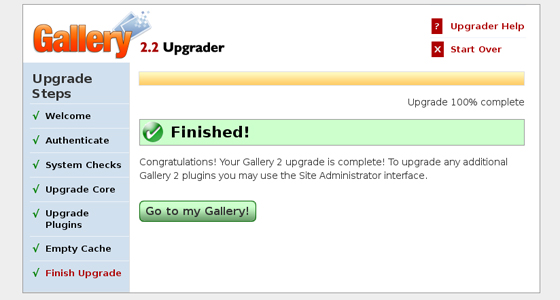
Upon successful completion it will drop you back into your Gallery 2 install with the latest version and you’re done.
If you do not feel ready to make the Gallery upgrade yourself and you have the alternative to purchase an application upgrade from our script installation specialists, by posting a ticket under:
Customer Area -> Get Support Section -> Get Support HelpDesk -> Exclusive Professional Services -> Application upgrade